Digital Signal Processing Basics for Beginners, Explained
Digital signal processing basics for musicians: sample rate and Nyquist, bit depth, FFT, EQ, compression, reverb, latency and dither, with worked numbers.
Digital signal processing basics start with one idea: a computer turns sound into a long list of numbers and changes the sound by doing arithmetic on them. Here are the basics of digital signal processing for beginners: sampling, bit depth, the frequency domain, filters, gain, delay and latency, each tied to a control in your DAW.
The figures below come from the textbooks, standards and manuals linked, read on 19 November 2026, with the arithmetic shown.
What digital signal processing means for a musician
A digital audio signal is a sequence of samples, each a number for the signal's level at one instant. Pull a fader down about 6 dB and every sample is multiplied by roughly 0.5. A mix bus adds the tracks' samples together. An EQ calculates each new sample from the last few inputs and outputs. Most plugins refine those three moves.
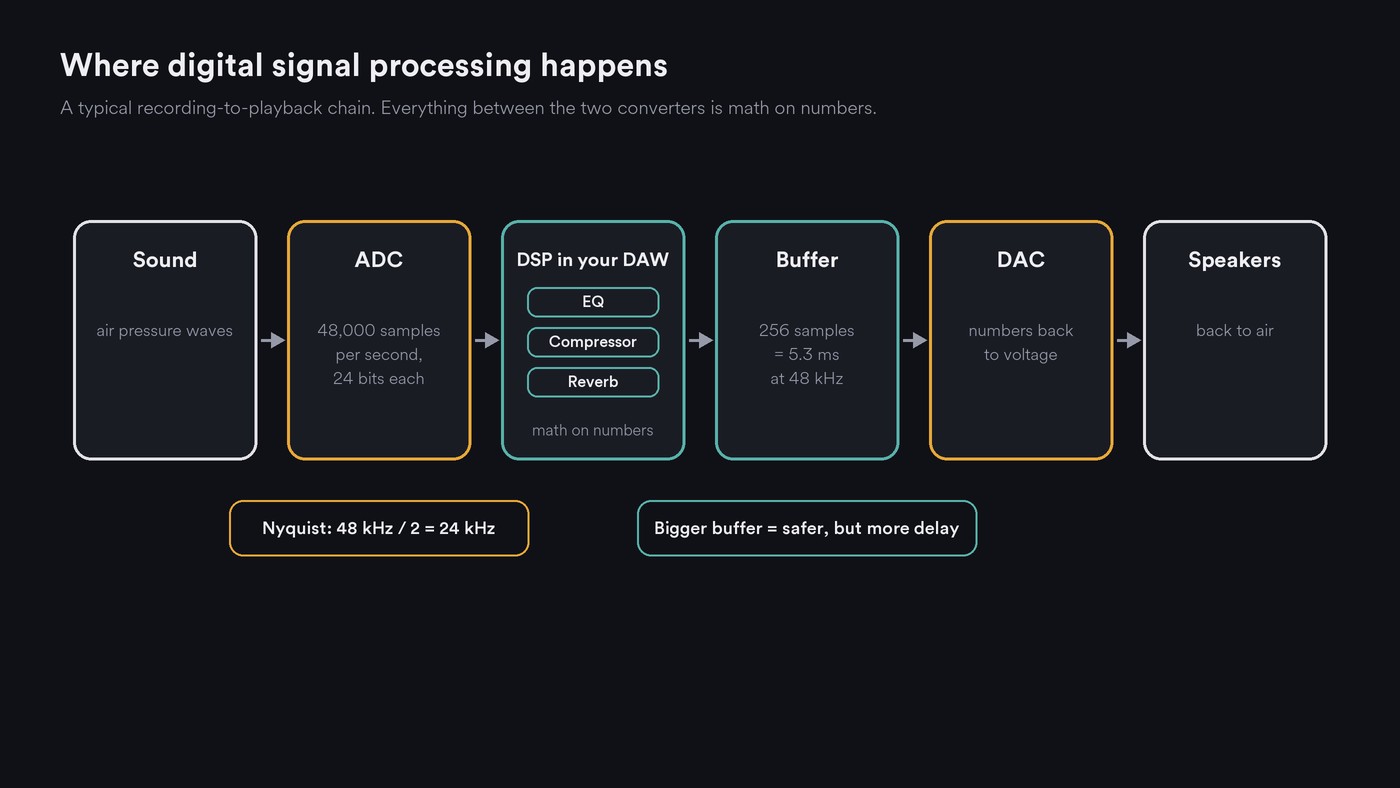
Sample rate, the Nyquist frequency and aliasing
The sample rate is how many samples are taken per second. Steven W. Smith's Scientist and Engineer's Guide to Digital Signal Processing (the DSP Guide) states the rule: "a continuous signal can be properly sampled, only if it does not contain frequency components above one-half of the sampling rate." That half is the Nyquist frequency:
- 44.1 kHz gives a Nyquist frequency of 22.05 kHz.
- 48 kHz gives 24 kHz.
- 96 kHz gives 48 kHz.
Anything above Nyquist folds back down as a false frequency, which is aliasing. The DSP Guide's example is a sine wave at 0.95 of the sampling rate that shows up as one at 0.05. In audio terms, a 30 kHz tone sampled at 44.1 kHz would land at 14.1 kHz (44.1 − 30), right in the range you hear. That is why converters filter out everything above Nyquist before sampling, and why some saturation plugins offer oversampling: harmonics they add above Nyquist would otherwise fold back as harsh tones.
The same book works out the data rate of CD-quality audio: 44.1 kHz × 16 bits = 706k bits per second, per channel.
Bit depth and dynamic range: about 6 dB per bit
Bit depth is how many levels each sample can take: 65,536 at 16 bits, 16,777,216 at 24 bits. Each sample is rounded to the nearest level, and the DSP Guide explains that this rounding error usually behaves like a little added random noise.
Julius O. Smith III of Stanford's CCRMA shows that each bit in linear PCM is worth 20 × log10(2), about 6 dB, of dynamic range. So:
- 16 bits gives about 16 × 6.02 = 96 dB.
- 24 bits gives about 144 dB on paper.
Hearing spans roughly 120 dB, he notes, so about 20 bits cover it; with headroom for processing, he calls 24 fixed-point bits reasonable and 32 preferable. DAWs use floating point: Ableton's Audio Fact Sheet says Live processes at 32-bit and sums signals at 64-bit. The practical rule: record at 24-bit, work at 32-bit float, and reduce bit depth only at the very end.
The time domain vs the frequency domain: what an FFT shows
A waveform view is the time domain: level over time. A spectrum is the frequency domain: how much energy sits at each frequency. The discrete Fourier transform converts one into the other, and the fast Fourier transform (FFT) is the quick way to compute it.
The DSP Guide's chapter on the DFT notes that N samples in the time domain give N/2 + 1 points in the frequency domain, running from 0 to half the sampling rate. The points are spaced at sample rate ÷ N:
- A 1,024-point FFT at 48 kHz gives 513 bins, 46.9 Hz apart, from 21.3 ms of audio.
- A 4,096-point FFT at 48 kHz gives bins 11.7 Hz apart, from 85.3 ms.
Finer frequency detail costs time detail, and a spectrogram is many FFTs in a row. For how mastering tools use this, see how AI mastering analyzes frequency balance.
Filters and EQ
A digital filter computes each output sample from the current input plus a few earlier inputs and outputs. Most EQ bands are biquads. The W3C's Audio EQ Cookbook (a Working Group Note of 8 June 2021, adapted from Robert Bristow-Johnson's original) gives the formulas for low-pass, high-pass, band-pass, notch, all-pass, peaking and shelf filters, converted from analog designs with the bilinear transform. After normalizing, a biquad is one line with five coefficients:
y[n] = b0·x[n] + b1·x[n−1] + b2·x[n−2] − a1·y[n−1] − a2·y[n−2]
Turning a frequency, gain or Q knob just recalculates those five numbers. Soundverse's EQ One page, for example, describes standard minimum-phase filters that add no latency, with a Q from 0.025 to 40 and nine band shapes.
Gain, compression and limiting as signal math
Gain is multiplication, and decibels are 20 × log10 of the factor: ×2 is +6.02 dB, ×0.5 is −6.02 dB, ×0.1 is −20 dB.
A compressor has three parts: a level detector, a gain curve and smoothing (attack and release). The W3C Web Audio API 1.1 draft of 22 September 2026 describes the curve as unchanged below the threshold, then a soft knee, then a slope of 1/ratio, with ratio defined as the dB change in input for each 1 dB change in output. A worked example: threshold −18 dB, ratio 4:1, a peak at −6 dB. That peak is 12 dB over, so it comes out 3 dB over, at −15 dB: 9 dB of gain reduction. The spec's compressor also delays the audio by a fixed 6 ms look-ahead, so it can react before peaks arrive.
A limiter is a compressor with a very high ratio and fast attack. Near the end of its chain, Mastering One runs a fast limiter set by its True Peak Ceiling. True peak matters because the reconstructed waveform can peak between samples; Analysis One measures it with 4× oversampling.
Delay and reverb: convolution in one line
A delay stores samples and plays them back later. Delay time in samples is seconds × sample rate: a quarter note at 120 BPM is 0.5 s, or 24,000 samples at 48 kHz. Feedback sends the output back in at reduced level: at a gain of 0.5, each echo is about 6 dB quieter than the last.
Reverbs are built either from networks of delays or by convolution. Convolution in one line: every input sample triggers a scaled copy of a room's impulse response, and the output is the sum of all those copies, y[n] = Σ h[k]·x[n−k]. The Web Audio spec's ConvolverNode does this. Reverb One is a convolution reverb that generates its stereo impulse response from your settings rather than from a recorded room.
Latency and buffer size
Audio moves through your computer in buffers, and each buffer takes buffer size ÷ sample rate to fill:
- 64 samples at 48 kHz: 1.3 ms.
- 256 samples: 5.3 ms.
- 1,024 samples: 21.3 ms.
What you hear while recording includes an input buffer, an output buffer and the converters, so keep buffers small for tracking and larger for heavy mixing sessions. Plugins add their own delay, such as the look-ahead above. Ableton's manual says Live automatically compensates for delays caused by built-in devices and plug-ins, keeping tracks in sync. Real-time AI tools face the same budget; see how AI audio achieves low latency.
Dithering: the last step before 16-bit
Reducing bit depth rounds every sample again. On quiet fades and reverb tails the error follows the signal and can sound grainy. Dither adds a tiny amount of random noise before rounding, so the error behaves like steady, low-level hiss; chapter 3 of the DSP Guide shows the idea. Apply it once, last. Ableton's fact sheet is blunt: "Dither should never be applied more than once to any given audio file." Mastering One offers optional TPDF dither for 16-bit files, after its limiter. For what distributors ask for, see the standard file format for distribution.
How DSP shows up in a DAW and in AI audio tools
In a DAW, faders are gain, EQs are filters, reverbs are convolution or networks of delays, and meters are FFTs and level math; Analysis One reads loudness with K-weighting over 400 ms and 3-second windows.
This two-minute tour shows AI Studio's built-in instruments and effects running in the browser.
AI tools sit on the same foundations. A model outputs audio at a fixed sample rate, so nothing exists above its Nyquist frequency; see what affects the audio quality of AI-generated tracks. Many models work on spectrograms, or on both views: HT Demucs, a stem-separation model, is described by its authors as a hybrid temporal/spectral network. Classic DSP also runs around the model. AI Vocal Quantizer keeps time-stretching between 0.94× and 1.08× with Preserve formants on, and Mastering One measures two seconds of your mix before it sets its controls.
Where Soundverse fits
Soundverse is an AI music platform that takes you from idea to audience, built for independent artists who release music. AI Studio lets you hear these basics at work: its plugins are standard signal processing in the browser, including parametric and mid/side EQ, a convolution reverb, a tempo-synced delay, compression, a mastering chain with dither and Analysis One's ten meters. On Creator and above, it exports WAV at 44.1, 48 or 96 kHz, as 16-bit, 24-bit or 32-bit float.
Where it's less suited: AI Studio doesn't load VST or AU plugins, EQ One has no linear-phase mode, and Analysis One measures only in real time, so deep technical work still suits a dedicated DAW.
FAQ
Should I record at 44.1 kHz or 48 kHz?
Both put the Nyquist frequency above 20 kHz. Pick one per project and keep it: Ableton's Audio Fact Sheet calls sample-rate conversion a non-neutral operation and recommends deciding the rate before you start.
Is 24-bit better than 16-bit?
For recording and mixing, yes: about 144 dB of theoretical range leaves headroom for processing. For the final file, 16-bit gives about 96 dB, and the DSP Guide says 44.1 kHz and 16 bits capture virtually all the sounds humans can hear. Dither once when you make it.
Do I need math to learn DSP as a musician?
Not much. Multiplying for gain, 20 × log10 for decibels and dividing by the sample rate for time cover most of it.
Sign up for Soundverse free and try these effects in AI Studio.
More guides on production and audio on the Soundverse blog.