What Are the Common Techniques for Editing Audio Stems?
Editing audio stems step by step in any DAW: align from bar 1, gain stage, clean bleed, comp, tune, fade, reamp, rebuild the arrangement and export back.
The common techniques for editing audio stems are aligning every stem from bar 1, gain staging, cleaning bleed with gates, EQ and spectral repair, comping and fixing timing, tuning vocal stems, fading every edit, reamping and resampling, rebuilding the arrangement, and exporting the edited stems back at one shared start point, length and format.
The steps work in any DAW; only the menu names differ (consolidate, bounce in place, glue, render). Manual details come from Ableton's Live 12 manual and iZotope's RX 9 documentation, checked on 14 November 2026.
Before editing audio stems: know what you have
Stems arrive three ways:
- Printed from a session. Same start, same length, usually clean.
- Sent by a collaborator. Check the sample rate, the start point and whether effects are printed.
- Separated from a stereo mix. Expect some bleed and a slightly watery sound on busy parts. Our comparisons of DAWs with built-in AI stem separation and free tools for isolating vocals cover where to get them.
Either way, keep the originals untouched and edit copies.
Step 1: Consolidate and align every stem from bar 1
- Create a session at the stems' sample rate, and set the tempo and time signature before importing.
- Drop every stem at the very start of the timeline: bar 1, or 0:00 if the stems include a count-in.
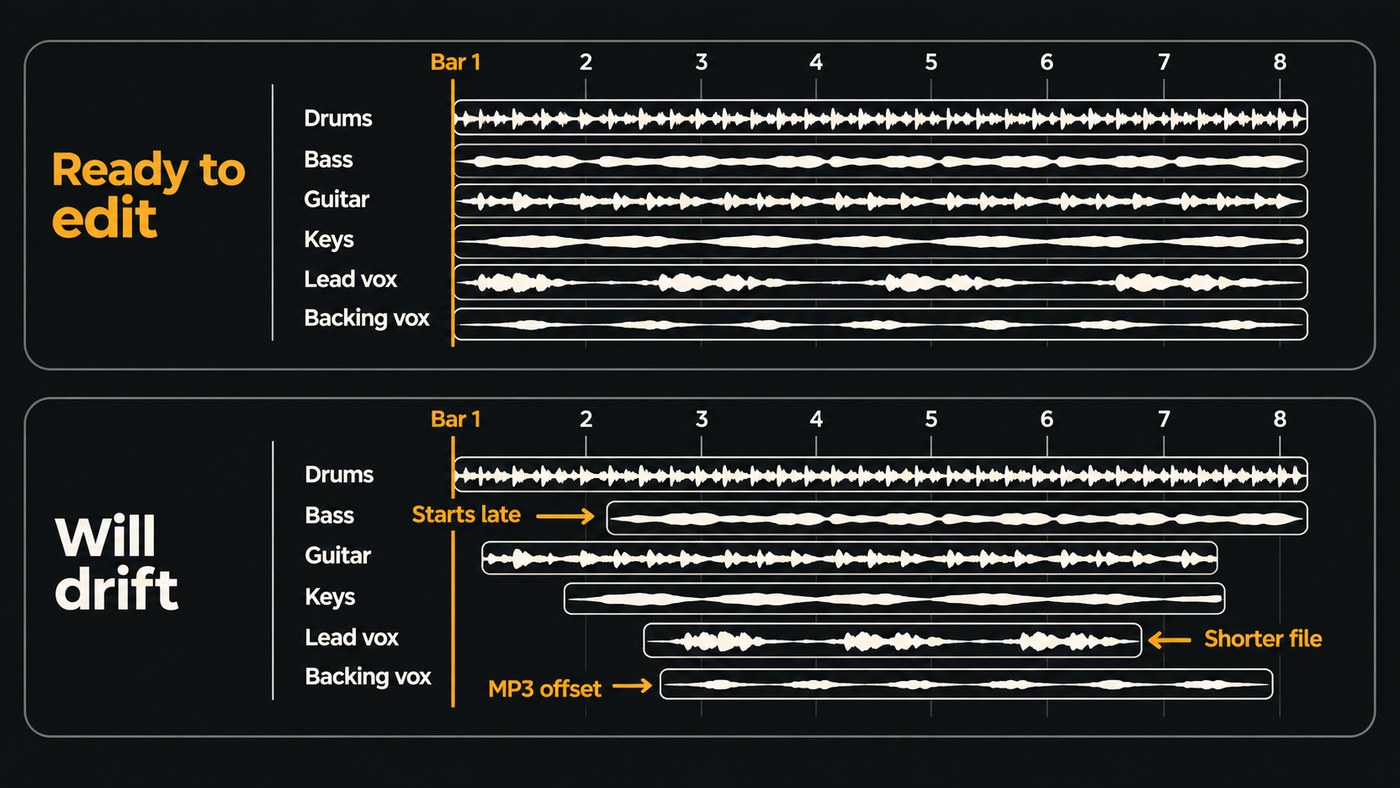
- Check that every file is the same length. Ableton's manual notes that its All Individual Tracks export gives every file the same length so they line up in any multitrack program. Ask for that standard.
- If a stem starts late, ask for a re-export from the song start, or line it up on a shared hit such as the first snare, zoomed in to sample level.
- Avoid MP3s. The same manual warns that an exported MP3 gets a little silence added at the start, which can throw off timing in another DAW.
- If you have the stereo mix, run a null test. Put the mix on its own track, flip its polarity and play it against all the stems at unity gain. Aligned stems cancel most of it; anything loud that's left points to a missing stem, an offset or master-bus processing.
- When your edits are done, consolidate each track into one continuous file from bar 1, so nothing depends on clip positions.
Step 2: Gain stage before you process
- Use clip gain, not the fader, to bring each stem to a working level. Peaks around -10 to -6 dBFS leave room for EQ boosts and saturation.
- Keep the master bus peaking a few dB below 0 dBFS with every stem playing.
- Don't normalize stems one by one. Normalizing raises each file until its own peak hits the maximum, which throws away the balance that was printed into them.
- Note every gain change, so returned stems can be matched to the originals.
For the full level-balancing pass, see how to balance audio levels in a multi-track project.
Step 3: Clean bleed with gates, EQ and spectral editing
Gates suit drum close mics and noisy vocal stems. Starting points to adjust by ear:
- Threshold just above the loudest bleed
- Attack under 1 ms on drums, a few ms on vocals
- Hold around 20 to 50 ms, release around 50 to 200 ms, matched to the instrument's decay
- Range of -15 to -30 dB instead of a full mute, so bleed drops away instead of switching off
- A key filter set to the drum's own range, so the hi-hat can't open the snare gate
On sparse tracks such as toms, cutting silences by hand is often cleaner than a gate.
EQ handles steady problems. High-pass anything that doesn't need lows (around 80 to 120 Hz is a common start on vocals), notch resonant rings with a narrow band, and low-pass hiss above an instrument's useful range.
Spectral editing reaches what EQ can't: a cough, a chair squeak, a phone buzz under a vocal. iZotope's RX 9 documentation describes Spectral Repair's Attenuate mode this way: "Attenuate reduces spectrogram magnitudes in the selected area to match magnitudes from the surrounding area, resulting in the removal of the sound without leaving an audible gap behind." When the bleed source is on its own track (a click, say, or a vocal leaking into a guitar mic), RX's De-bleed learns the relationship between the two tracks, which must be time-aligned and share a sample rate.
Go gently on AI-separated stems. Hard gating and narrow EQ cuts make separation artifacts more obvious, and a little leftover bleed under a full mix often sounds better than a hollow, over-cleaned stem.
Step 4: Comp takes and fix timing
Ableton's manual puts comping simply: "Comping makes it possible to pick the best moments of each recorded performance and combine them into a composite track (also known as a “comp”)." The same method works in any DAW with take lanes or playlists:
- Stack the takes on lanes under one track and listen phrase by phrase.
- Promote the best phrase from each, cutting on a consonant, a breath or just before a transient, where edits hide.
- Crossfade every join (Step 6).
For timing:
- Slice at transients and nudge, or use your DAW's warp, flex or elastic mode for small moves.
- Quantize at 50 to 80% strength instead of 100% to tighten the part without flattening the feel.
- Group multi-mic drum stems and edit them together. Moving one mic on its own causes phasing.
- Stretch as little as possible; big stretches add artifacts.
Step 5: Pitch correction on vocal stems
- Clean and comp first. Bleed and noise confuse pitch detection.
- Pick the mode: note-by-note editing for a natural result, or automatic correction with a key and retune speed for quick fixes and the hard-tuned sound.
- Leave breaths, "s" sounds and deliberate slides alone.
- Tune the lead first, then tune doubles and harmonies to the lead rather than each to the grid, so the stack stays tight.
- Render the tuned vocal to audio before export, so the stem doesn't depend on a plugin the next person may not own.
Our roundup of affordable apps for vocal pitch correction compares the tools.
Step 6: Fades and crossfades on every edit
- Put a short fade of a few milliseconds on every cut, so no click survives.
- Use crossfades of roughly 10 to 30 ms on comp edits, and longer ones on sustained sounds such as pads.
- Choose equal-power crossfades between different takes, and equal-gain within one continuous take, where both sides are phase-matched.
- Fade reverb and delay tails out instead of chopping them.
- Never trim the start of a stem. Fade in instead, or the alignment from Step 1 is gone.
Step 7: Reamp and resample
Reamping puts a recorded part through real gear after the fact. Send a clean DI stem (guitar, bass or synth) out of your interface through a reamp box, which brings the line-level signal down to what an amp or pedal expects, then mic the amp and record the result. The round trip adds delay, so line the new track up with the original on a clear transient.
Resampling treats a printed stem as raw material. Print a vocal phrase through delay and chop it into a hook, reverse a reverb into the chorus, or distort a drum stem and blend it underneath. Keep the original muted beside it.
Step 8: Rebuild an arrangement from stems
- Mark the sections (intro, verse, chorus, bridge) with markers.
- Select all tracks and edit on bar lines, so every stem moves together.
- Use mutes for breakdowns and drops, and duplicate or cut whole sections for a radio edit or an extended mix.
- Bounce the versions you need: instrumental, a cappella, clean and short edits.
If a rebuilt section needs a part that was never recorded, Soundverse's AI Stem Generator, on the Creator plan and up, makes one new part that fits the song as its own audio track.
Step 9: Export the edited stems back
- Give every stem the same start (bar 1 or the session start) and the same length, silence included.
- Export WAV at the session's sample rate, in 24-bit, or 32-bit float if someone will process the files further. Ableton's manual notes that dithering should be applied only once, so leave it for the final master.
- Skip normalizing and master-bus processing unless you've agreed otherwise. If effects are part of the sound, send wet and dry versions.
- Name files clearly, for example
SongTitle_120bpm_Am_05_LeadVox_wet.wav. - Import everything into an empty session at bar 1 and play it through once before you send it.
This walkthrough of Soundverse's Edit tools shows Stem Separator from 1:28 and AI Stem Generator from 1:52.
Where Soundverse fits
Soundverse is an AI music platform that takes you from idea to audience, built for independent artists who release music. When the session files are gone, Stem Separator splits a finished mix into 2 stems, 6 stems, or a maximum split with a MIDI file for each part (Creator and up), with WAV or FLAC for the 2- and 6-stem splits. In AI Studio you can split, trim, fade and move clips, fit imported audio to the project tempo with Follow tempo, draw automation, and use EQ One and De-Esser One. On Creator and up, it exports one file per track in a ZIP, with or without each track's effects.
Two limits to know: AI Studio doesn't load third-party VST or AU plugins, and its VocalTune One pitch correction plays back live but isn't applied when you export. Print tuning in your DAW.
FAQ
Should stems include effects? For mastering or a remix pack, usually yes, since the effects are part of the sound. If the receiver may rebuild the mix, send dry versions too, and agree before you export.
How do I clean bleed out of an AI-separated stem? Lightly. EQ out the clearly unwanted range, use spectral repair on single events, and judge the stem inside the full mix. Start from your best copy: Soundverse's Stem Separator page advises a WAV master over a compressed MP3, since a separator can only split what's already in the mix.
Can I edit stems from a song I don't own? For private practice, yes. For anything you release, you need permission, because stems separated from someone else's song are still covered by that song's rights.
Sign up for Soundverse free and split your next mix into stems you can edit. More production guides on the Soundverse blog.