How to Balance Audio Levels in a Multi-Track Project: Step by Step, in Any DAW
How to balance audio levels in a multi-track project: gain staging, a static fader mix, clip gain, buses, reference loudness and metering, in any DAW.
To balance audio levels in a multi-track project, gain-stage every track to a similar level first, build a static mix on the faders starting with the most important part, even out phrases with clip gain, group related tracks onto buses, then check the balance on meters and against reference tracks at matched loudness.
The steps below work the same in Logic Pro, Ableton Live, FL Studio, Pro Tools, Reaper, Cubase, Studio One or a browser studio. Only the button names change.
What a balanced mix sounds like
Every part sits at the importance you intend: the lead vocal or hook on top, kick and bass solid without swamping anything, supporting parts audible when you listen for them. Two quick tests: you can follow the lyric without straining, and nothing jumps out when you play the song quietly.
Step 1: Set up the session before you touch a fader
- Name and colour your tracks, and delete empty or silent clips.
- Reset every pan to centre and bypass any processing on the master bus.
- Set your monitors or headphones to a moderate level you could talk over, and leave it there. Volume changes how you hear bass and treble.
- Import two or three reference tracks in your genre onto a track routed straight to your output, so they skip your master bus.
- If all you have is a stereo bounce of a beat or a demo, split it into stems first. Our explainer on what track stems are covers how they're used.
Step 2: Gain stage every track
Gain staging means setting each track's level at the start of its chain, so every plugin gets a sensible signal and your faders end up near 0 dB, where they're easiest to fine-tune. Modern DAWs process in floating point, so you won't clip inside a channel, but levels still matter. Sound On Sound's Matt Houghton explained why in April 2026: plugins that model analogue gear react to how hard you drive them, meters tell you little when levels are all over the place, and comparing a plugin in and out is easier when you don't have to compensate for level jumps. On whether to calibrate your meters to -20, -18 or -16 dBFS, his advice was: "Unless you’re integrating hardware gear into your system, it doesn’t much matter which figure you pick as long as you’re consistent."
A setup that works:
- Aim for an average (RMS) level around -18 dBFS on each track, which is 0 on a VU meter calibrated to -18, with peaks well below 0 dBFS.
- Adjust with clip gain or a gain plugin at the top of the chain, not with the fader. In Logic Pro this is region gain, with a range from -30 dB to +30 dB according to Apple's guide.
- For virtual instruments, lower the instrument's own output volume rather than the channel fader.
- Do it once, before you add plugins.
Step 3: Build a static mix with the faders
A static mix is one fader position per track for the whole song, with no automation yet.
- Pull every fader all the way down.
- Bring up your anchor first. In a vocal-led song that's the lead vocal; in hip-hop, EDM and most dance music it's usually the kick and bass. Set it so the master peaks around -10 dBFS, leaving room for everything else.
- Add parts in order of importance: drums, bass, the main chord instrument, then pads, percussion, backing vocals and effects.
- Raise each new part until you clearly hear it, then pull it back 1 to 2 dB. That keeps the mix from creeping louder every time you add something.
- Pan as you go. Panning changes how loud a part feels, so set pans before you settle the faders.
- Listen in mono for a few seconds. If a part vanishes, it has a phase problem or depends on stereo width to be heard.
- Check at a whisper level too. You should still hear the vocal and the kick.
With everything playing and nothing on the master bus, the loudest peaks should land around -6 to -3 dBFS.
Faders vs clip gain: which one to use
Both change volume. The difference is where they act in the signal path.
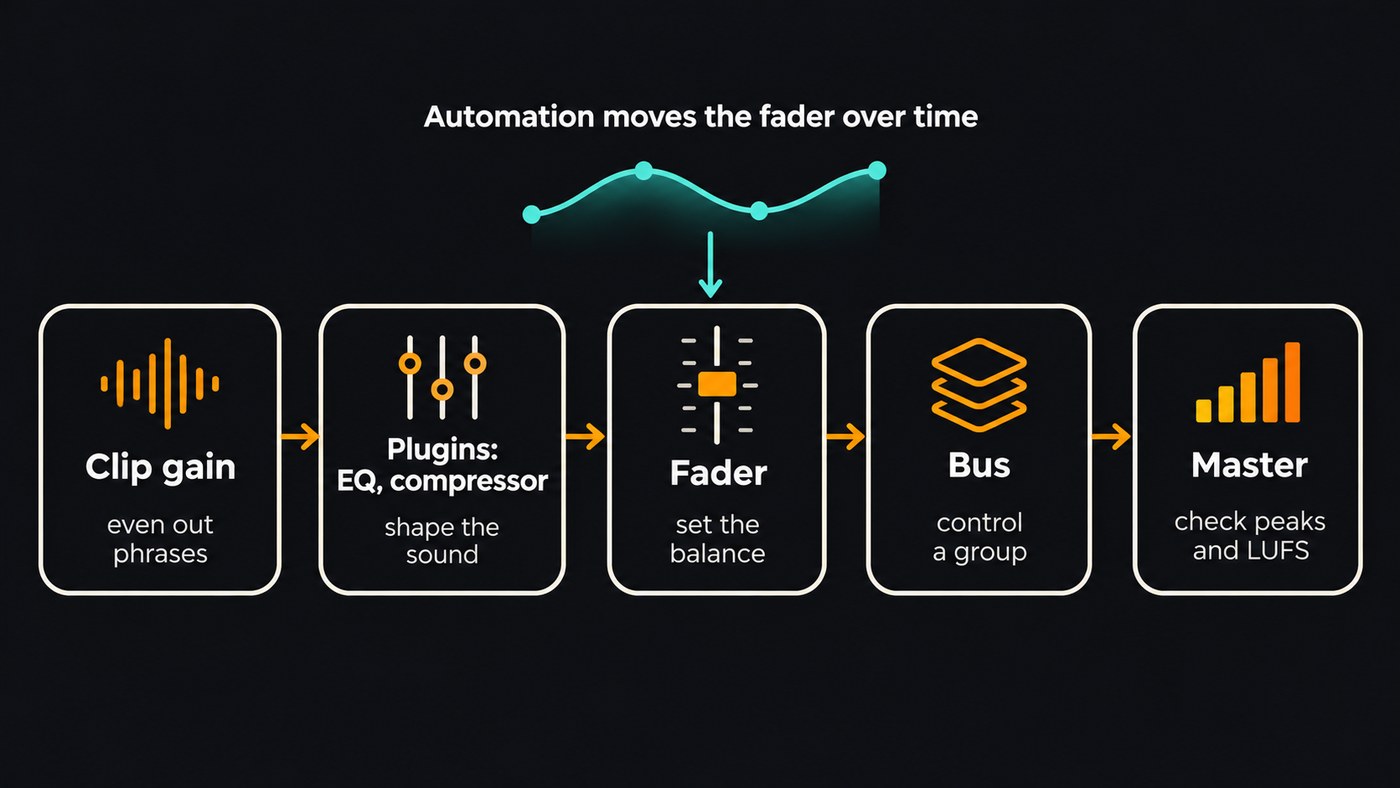
- Clip gain (region gain or item volume in some DAWs) changes the audio before it reaches your plugins. Use it to even out phrases: a shouted word, a quiet line, a loud breath. Turn a loud phrase down with clip gain and your compressor works less on it; turn it down on the fader and the compressor behaves exactly as before.
- The fader sets the track's place in the mix after all its processing. Use it for the static balance.
- Volume automation moves the fader over time. Use it for sections and moments, such as lifting the vocal 1 dB in the last chorus or dipping a guitar under a vocal line.
A good order: clip gain for phrases, then plugins, then the fader for balance, then automation last.
Step 4: Group tracks onto buses
Route related tracks to a bus (some DAWs call it a group or submix): all drums, all backing vocals, all guitars or keys.
- Balance inside the group first, then use the single bus fader to set the group against the rest of the song.
- Three to six buses is plenty for most songs. More, and you're back to juggling too many faders.
- Gentle bus compression, around 1 to 2 dB of gain reduction, glues a drum kit or a vocal stack, but it also shifts the balance inside the group, so check it again.
- Put reverb and delay on send buses, so the wet sound stays in proportion when you move a track's fader.
- Watch the bus meter. A bus summing ten tracks can run hot even when each track looks fine.
Step 5: Ride levels with automation
Once the static mix works for most of the song, play it through and write fader moves only where the balance breaks: a vocal line that dips under a guitar fill, a chorus that needs a lift, a word that gets lost. Moves of 1 to 3 dB are usually enough. Riding the vocal phrase by phrase before the compressor (clip gain) and after it (automation) is how a vocal stays on top without sounding squashed. Our guide to mixing vocals like a pro goes further on the vocal itself.
Step 6: Compare with reference tracks at matched loudness
Loudness won't win you much on services that normalise playback, turning songs up or down to a target. Spotify's artist help page says it adjusts tracks to -14 dB LUFS, measured to the ITU 1770 standard, and puts it simply: "Loudness normalization means we don’t always play your track at the level it’s mastered."
So compare balance, not volume:
- Turn the reference down until it sounds as loud as your mix. A finished master is far louder than an unmastered mix, and louder always sounds better.
- Switch back and forth every few seconds. Compare the vocal against the snare, the low end against the kick, and how loud the backing parts are.
- Adjust faders before EQ. Most "this sounds wrong" moments at this stage are level problems.
- Leave the master bus without a limiter. Loudness is the mastering stage's job, and our comparison of AI mastering services for singer-songwriters on a budget picks up from there.
Metering: what to watch while you balance audio levels
- Peak meters show the highest sample. Keep every channel and bus below 0 dBFS.
- True peak (dBTP) catches peaks between samples that appear after conversion and encoding. Spotify recommends keeping masters below -1 dBTP.
- RMS or VU shows average level, your best guide for gain staging.
- LUFS measures perceived loudness, as defined in ITU-R BS.1770, now at revision BS.1770-5. Read short-term LUFS on sections and integrated LUFS over the whole song.
- Correlation shows whether left and right are in phase. Readings near -1 warn that parts may cancel in mono.
Meters confirm what you hear. If the mix sounds right and the meters are in range, stop.
Common level-balancing mistakes
- Mixing too loud, which makes everything exciting and hides imbalance.
- Balancing in solo. A part only has to sound right with everything else playing.
- Using a compressor to fix level jumps that clip gain should fix.
- Turning everything else up instead of turning one thing down.
- Putting a limiter on the master early and mixing into it.
Where Soundverse fits
Soundverse is an AI music platform that takes you from idea to audience, built for independent artists who release music. AI Studio is a multitrack studio in your browser with the tools this guide uses: a Mixer for the fader balance, a Utility effect with ±12 dB of gain for clean level matching, and volume, pan and effect automation that exports with the mix. Analysis One adds LUFS with -14 and -23 markers, 4× oversampled true peak, correlation and spectrum meters to any track or the master bus. Mix One places typed tracks by genre and carves clashes, but it doesn't set fader levels, so you still balance by ear. All of this runs on every plan with no tokens; Free projects hold 3 tracks, Creator 8 and Pro 20. Licensing is set by plan: the Free plan is for personal use, and the Creator plan comes with a royalty-free license.
This short clip shows how to add automation to an audio track in Soundverse AI Studio.
FAQ
What level should each track be at in a mix? An average around -18 dBFS (RMS) per track is a common, consistent target, with peaks well under 0 dBFS. The exact number matters less than using the same one on every track.
How loud should my mix be before mastering? Leave the master bus without a limiter and let the loudest peaks land around -6 to -3 dBFS. Loudness belongs to mastering, and services such as Spotify normalise playback anyway.
Should I use clip gain or compression to even out a vocal? Clip gain first, for big jumps between phrases and words, then compression for the smaller movement inside them. A compressor pushed hard to fix level jumps tends to sound squashed.
Can AI balance the levels in my mix for me? Mixing assistants can propose a starting point, but you still have to judge it. Soundverse's Mix One deliberately leaves fader levels to you and works on placement and frequency clashes instead.
Sign up for Soundverse free and balance your next multi-track session in AI Studio.
More mixing guides on the Soundverse blog.