How Does Automated Audio Mixing Differ From Manual Equalization?
Automated audio mixing vs manual EQ: what Neutron, smart:EQ, Logic Match EQ and Mix One automate, where ear-led EQ wins, plus a hybrid workflow.
Automated audio mixing analyzes every track, finds where parts mask each other and proposes levels, pans and EQ moves toward a genre or reference target in seconds. Manual equalization is you, listening, cutting and boosting frequencies on each track for this particular song. Automation gives you a fast, consistent draft; manual EQ makes the final calls.
Below: what manual EQ does, what assistants such as iZotope Neutron 5, sonible smart:EQ 4, Logic Pro's Match EQ and Soundverse Mix One actually automate (from each maker's own documentation, read on 19 November 2026), where each approach wins, and a hybrid workflow with examples. Level balancing has its own guide, how to balance audio levels in a multi-track project, and the mastering side is covered in how AI mastering compares to manual engineering.
What manual equalization does in a mix
Mix EQ is mostly subtraction and choice: deciding which part owns each frequency range, then clearing room for it.
- High-pass filtering. Remove what a part doesn't need below its lowest useful note. In his July 2026 guide to EQing vocals for iZotope, Chris Wainwright starts a vocal with a steep high-pass somewhere between 50 and 100 Hz, found by sweeping up from 20 Hz until it touches the voice, then backing off a little. The same move cleans guitars, keys, pads and hi-hats.
- Cutting masking frequencies. When kick and bass both sit around 60 to 100 Hz, pick which one owns the lowest octave and dip the other there. A 2 to 3 dB cut on a rhythm guitar around 3 kHz often lets a vocal through better than boosting the vocal.
- Clearing mud. Wainwright places a vocal's body between 100 and 400 Hz, where too much sounds boomy. Boost a narrow band, sweep to find the resonance, then cut it; in his example the resonances sat at 185 and 370 Hz.
- Presence and air. He calls 2 to 5 kHz the range where ears are most sensitive and keeps moves there to 1 or 2 dB, brightening at 8 to 12 kHz instead. Sibilance at 5 to 8 kHz goes to a de-esser rather than a static cut.
- Dynamic EQ. FabFilter's Pro-Q 4 help describes a dynamic band as one whose gain changes with the level of the input signal, much like a multiband compressor. It's the tool for a vocal that turns harsh only on belted notes, or one bass note that booms.
- Ear-led decisions. You judge every move with the full mix playing, level-match before and after, and decide what the song needs. A thin, filtered vocal in the intro can be the point.
What automated mixing assistants do
Every assistant below listens first, then proposes. They differ in what they're allowed to change.
- Track analysis and levels. The Neutron 5 manual describes the Visual Mixer Assistant listening to each track's overall level, sorting tracks into Focus, Voice, Bass, Percussion and Musical groups, and setting static levels. Group sliders move ±12 dB around its suggestion, and Bypass Assistant plays your original balance gain-matched for comparison. Shahan Nercessian summed up the idea when iZotope introduced it in June 2019: "Mix Assistant gives you a starting point for your mix by listening to it and automatically suggesting gain levels for all the tracks in your session."
- Masking detection. Neutron's Masking Meter shows where two tracks compete, and the Neutron 5 manual is careful about what that means: "These tools simply show where masking is occurring. It is up to you to determine when this masking is problematic and requires further action." Its Unmask module goes further, as a dynamic sidechain tool that cuts across 32 bands only while masking happens.
- Cross-track unmasking. sonible smart:EQ 4 lets you group up to 10 tracks and rank them toward the front, middle or back of the mix, so lower-priority parts give way. Each instance runs in Track, Group or Track & Group mode.
- Genre and instrument targets. smart:EQ 4's smart:filter balances a track toward a Profile (instrument, vocal or genre, or one learned from a reference track) after listening to at least 6 seconds of audio. Neutron's Target Library offers instrument targets and reference targets built from your own files.
- Auto-EQ suggestions. Logic Pro's Match EQ analyzes the average spectrum of a reference and builds a filter curve to match it, which you can edit first; Apple notes it doesn't match dynamic differences. Soundverse Mix One lists the corrective moves it detects in each track's TONE tab (a high-pass, a mud, boxiness or harshness cut, a de-ess cut), each with a frequency and a confidence, and Fix all applies them.
Automated audio mixing vs manual EQ: where each wins
Automation wins on:
- Speed. A first balance or EQ pass on a big session in minutes rather than an evening.
- Seeing the whole mix. Masking between two tracks rarely shows up when you solo either one; a conflicts view lays out every overlap at once.
- Consistency. The same starting point across a beat pack, an EP or a run of client demos.
- A second opinion. If an assistant wants a big cut at 300 Hz, your mix probably has too much there, whatever you then decide.
Manual EQ wins on:
- Intent. Which part is the hero in each section, and whether the chorus should feel brighter than the verse.
- Problems that come and go. A static carve works on the whole song, but harshness on three words needs a dynamic band or automation.
- Arrangement fixes. Muting a part, moving it up an octave or swapping a sound beats any EQ curve.
- Creative EQ. Telephone vocals, lo-fi filtering and resonant sweeps are choices, not corrections.
- Unusual sources. Assistants sort tracks into the roles they know, and an instrument outside those roles gets a generic treatment.
A hybrid workflow with examples
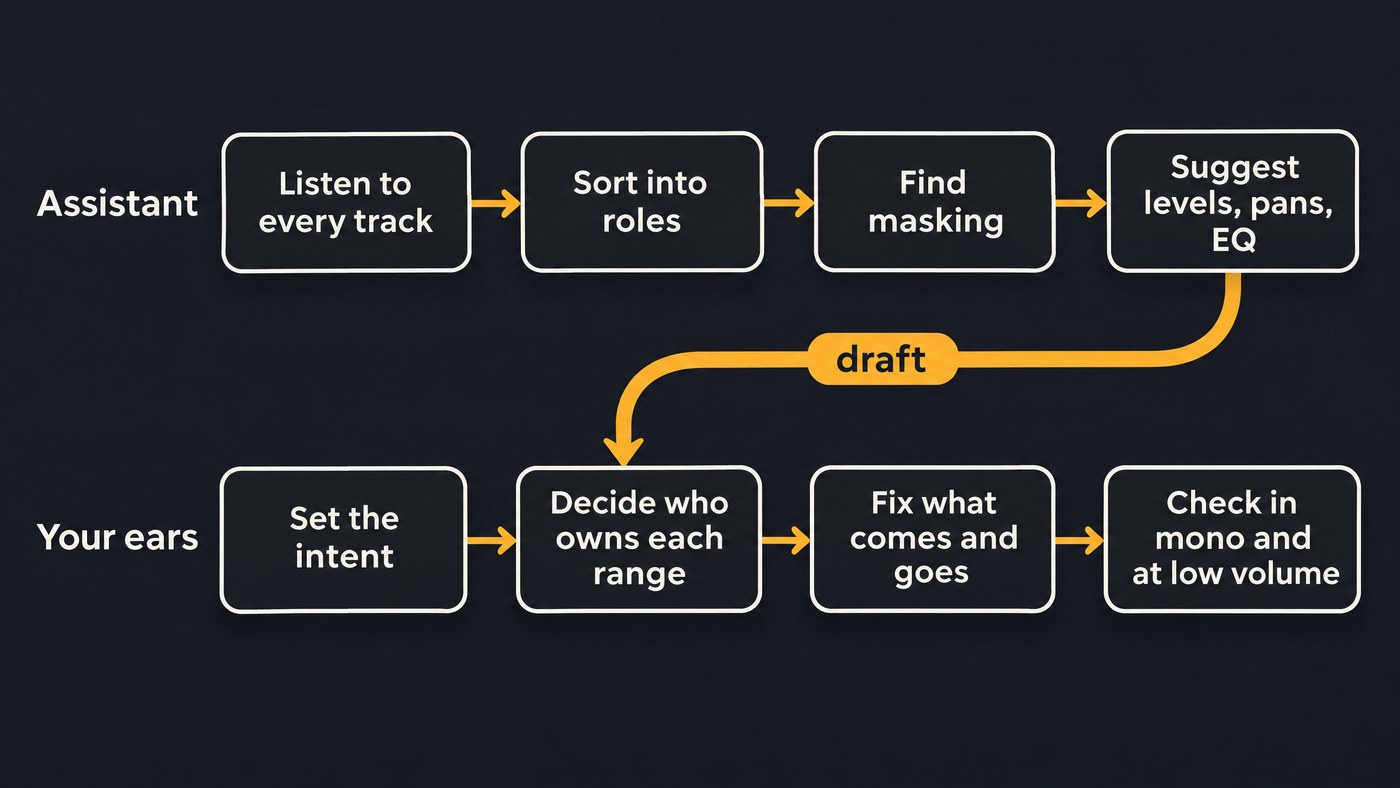
- Balance first. Set rough levels by ear, or let a level assistant propose them and adjust. iZotope recommends running Visual Mixer's Assistant on raw stems with DAW faders at unity.
- High-pass by hand. It takes a minute, and you know what each part needs to keep.
- Run the assistant with an honest target. Label or type every track, then choose the genre template, Profile or reference closest to your song.
- Compare at matched loudness. Bypass the assistant and switch back and forth. Louder always sounds better at first.
- Treat its findings as a to-do list, then fix by ear.
- Pull the automatic amount back. Mix One's AMT slider scales its placement from none to full, Neutron's Equalizer control blends its suggested EQ curve, and smart:EQ 4's Smoothing makes its filtering gentler. Start lower and raise until the problem goes.
- Check in mono, at a whisper and against a reference, then hand off to mastering.
Three examples of step 5:
- Trap beat with a buried vocal. The assistant flags the lead synth masking the vocal around 2 to 4 kHz. Instead of a permanent dip, put a dynamic band on the synth at about 3 kHz, keyed from the vocal, so the synth keeps its bite between lines. Our guide to mixing vocals like a pro covers the vocal chain itself.
- Indie song with two guitars and a pad. The assistant pans the guitars apart and flags mud around 250 Hz on all three. Keep the pans, but cut the pad rather than the guitars, because the guitars carry the riff, and high-pass the pad higher than the template did.
- Acoustic vocal harsh only in the chorus. Auto-EQ suggests a static cut near 3 kHz that dulls the verses. Replace it with a dynamic band at the same frequency that moves only on loud notes, and a de-esser for the S sounds.
For how automated results compare with professional mixes overall, see AI music mixing quality, automated vs professional.
Where Soundverse fits
Soundverse is an AI music platform that takes you from idea to audience, built for independent artists who release music. In AI Studio, Mix One covers the automated half: set each track's type, pick a genre template such as Pop / Universal, Hip-Hop / Trap or Filmi / Bollywood, click Auto-Place and turn it on. It pans and carves lower-priority parts where they mask higher ones, names each clashing pair with its frequency range, and flags mud, boxiness and harshness per track. Switching it OFF restores the pans you had, and snapshots A, B and C hold layouts to compare.
It doesn't set fader levels, its carve is a fixed EQ dip and its de-ess move is a static cut, so the manual half stays yours. Among the AI plugins, EQ One offers mid/side per band but no dynamic mode, and De-Esser One reacts when sibilance gets loud. All of it runs in your browser on every plan. Licensing is set by plan: the Free plan is for personal use, and the Creator plan comes with a royalty-free license.
This short video shows Mix One placing a project's stems by genre, then Mastering One on the master bus, with the raw, mixed and mastered versions compared.
FAQ
Can automated mixing replace manual EQ? For a first draft, often. For final decisions, no: assistants measure overlap and balance, but they can't know which part the song is about or what you meant by warmer. Use them to find problems faster, then decide by ear.
Should I EQ before or after running a mixing assistant? Do obvious corrective work, such as high-passing rumble, before. Level assistants work best on raw tracks, so keep heavy tone shaping until after the assistant's pass, then refine by ear.
Is auto-EQ the same as dynamic EQ? No. Most auto-EQ moves are static curves learned from a stretch of audio, such as Match EQ's average spectrum. Dynamic EQ changes gain with the signal level. Some assistants include dynamic tools, such as Neutron's Unmask and smart:EQ 4's dynamic standard bands.
Does automated mixing work on separated stems or AI-generated parts? Yes, as a starting point. In Mix One, set a type on each stem first, because stems from Stem Separator arrive named but untyped. Our explainer on what audio stems are covers how stems are prepared.
Sign up for Soundverse free and try Mix One on your next session in AI Studio.
More mixing guides on the Soundverse blog.