AI Video Consistency: How to Keep Faces, Clothes and Locations the Same in Every Shot
AI video consistency guide: keep faces, clothes and rooms the same across shots, with reference sheets, prompt templates and fixes for films and music videos.
AI video consistency comes from giving the model the same information for every shot: one set of reference images for each character, outfit and location, one fixed description pasted unchanged into every prompt, and a first frame that already looks right. The model doesn't remember your last clip, so everything it needs has to travel with each generation.
This guide covers the whole workflow, from the reference sheets you make before generating anything to the fixes you apply after. It goes through faces, clothes and the rooms of a house one at a time, then applies them to narrative film scenes and to AI music videos.
Why AI characters and sets change between shots
A video model starts every generation from scratch. "A woman in a red jacket in a living room" has thousands of valid answers, and the model picks a new one each time. Your own idea of the character exists only in your head and in whatever you hand over with the prompt.
Three things make the drift worse:
- Long and chained clips. Small errors build up over a long take. Extending a clip from its last frame copies whatever went wrong at the end of the previous one.
- Small faces. In a wide shot a face may be only a few dozen pixels across, so the model has very little to hold on to. Identity drifts most in wides.
- Fine detail. Text, logos, stripes, jewellery, hands and anything that sits on one particular side of the body get redrawn slightly differently every time.
Model makers are working on this. In January 2026, Ricky Wong, Lead Product Manager at Google DeepMind, described the aim of Veo 3.1's updated Ingredients to Video as: "Keep your characters looking the same even as the setting changes, making it easier to tell a full narrative by having the same character appear across multiple scenes" (Google). Better models help, but they still need to be told what to keep.
The fix for all three problems is the same: decide every detail once, write it down, show it as images, and reuse exactly that material in every shot.
Build a continuity bible before you generate anything
On a film set, the script supervisor logs what every actor wore, how they wore it and where every prop sat, take by take, because scenes are shot out of order. In AI video you are the script supervisor, and your log is a folder of reference images plus one text file. Make four sheets:
- Character sheet, one per character: portraits from several angles and a written list of identity anchors.
- Wardrobe sheet, one per outfit: the clothes laid out or on a plain figure, plus accessories and which side they sit on.
- Set sheet, one per location or room: a master wide image, a rough floor plan and a list of fixed props.
- Look sheet, one per project: aspect ratio, lens, time of day, light direction, colour palette and grain.
Name the files so they sort and explain themselves, for example MAYA_face_front.png, MAYA_outfit1_jacket.png and KITCHEN_master_wide.png. When a shot goes wrong, you'll want to see in seconds which references it used.
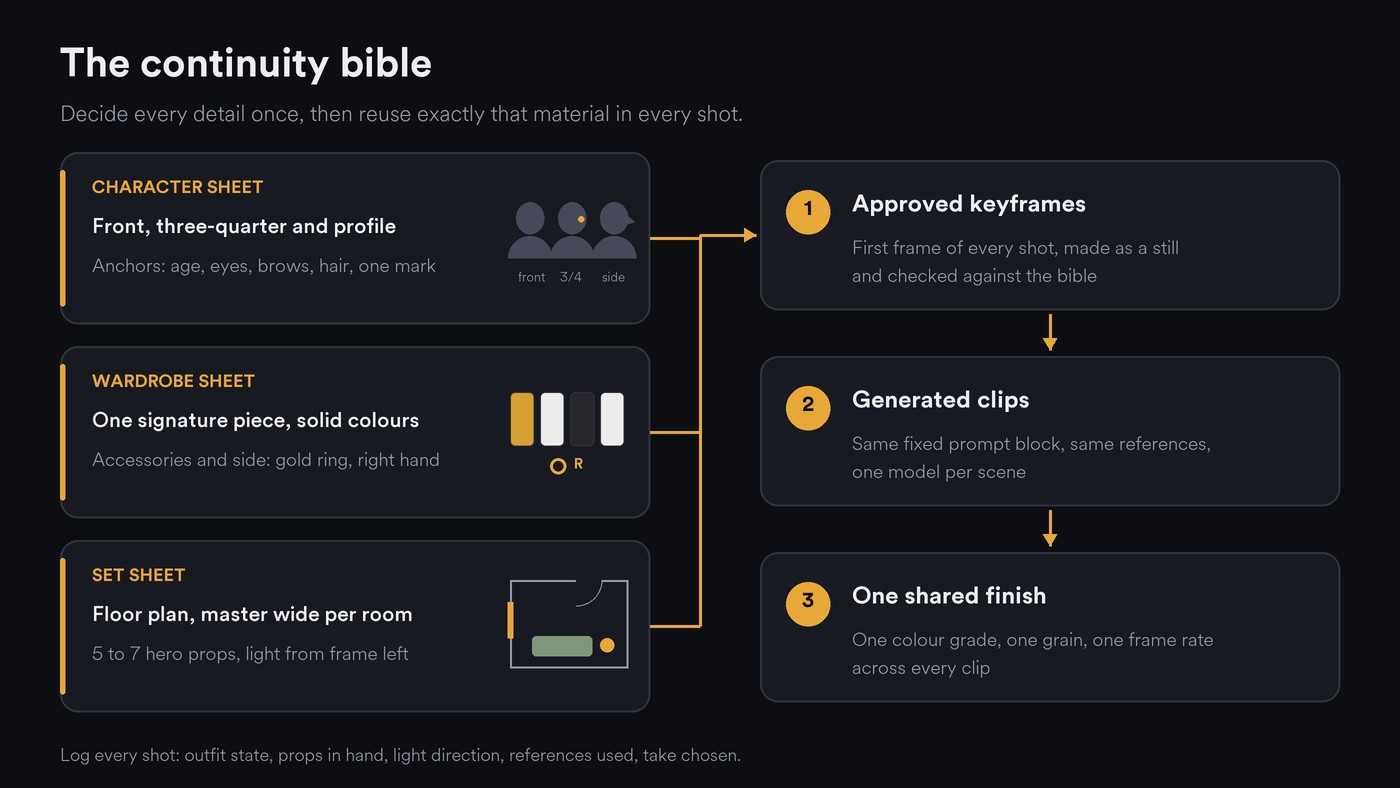
Make these sheets as still images first. Stills are cheap and quick to regenerate, so you can try ten versions of a face or a room before you spend anything on video. Google suggests the same order for Veo: its January 2026 post recommends making your "ingredient images" in its image model first, then turning them into video. Google's developer post on Veo 3.1 (October 15, 2025) explains why reference images matter: "You can now guide the generation process by providing up to 3 reference images of a character, object, or scene. This is helpful for maintaining character consistency across multiple shots or applying a specific style to your video."
How to keep a face consistent across shots
The face is what viewers check first, so start there.
Make a clean reference set. You want three images of the same person: a front portrait, a three-quarter view and a profile. Use a neutral expression, soft even light and sharp focus. Runway's guide to consistent AI characters gives the same advice and lists what to avoid: blurry faces, sunglasses or objects covering the face, and extreme angles that hide key features.
Make sure every reference shows the same person. If your three images disagree slightly, say a sharper jaw in one or a different hairline in another, the model blends them, and you get a fourth face that matches none of them.
Write the anchors down. Give the character a name and a fixed description, and paste it into every prompt: age, face shape, eye colour, brow shape, nose, hair length, parting and colour, and one or two distinctive marks. "A small mole above the left corner of her lip" does more for identity than "beautiful".
Lock the hair. Hair is part of identity. Fix the length, the parting and whether it's tied back, and keep it that way unless the story changes it.
Test expressions before you need them. Shouting, crying and laughing pull a face out of shape, and that is often where identity breaks. Generate an expression sheet from your references early, and keep only expressions that still read as your character.
Frame for identity. In wide shots, let the silhouette, hair and outfit carry the character, then cut to a medium or close shot to confirm the face. A sequence of wides with tiny faces is where viewers start to wonder whether it's the same person.
Keep performance shots in one take. For a character who speaks or sings, generate the line from a portrait plus the audio in one continuous clip rather than cutting short pieces together. Cut-together lip-sync is usually the first thing an audience notices. Our post on AI lip sync and character replacement with Seedance 2.5 walks through that workflow.
Use only faces you're allowed to use. That means your own face, or someone who has given you permission. Some video models, Veo 3.1 among them, also block prompts about real people and public figures.
How to keep clothes the same in every shot
Wardrobe mistakes are some of the easiest for viewers to spot, and most of them can be prevented at the design stage.
Design clothes the model can repeat. Solid colours and simple shapes hold up. Small text, logos, stripes, checks and fine prints come back different in every shot. Give each character one signature piece, such as a mustard corduroy jacket, and keep the rest plain.
Give the outfit its own reference image. A flat lay or the outfit on a plain figure, front and back, kept separate from the face references. Kling's Elements guide (November 2025) suggests the same split: you can set clothing and scenes as their own elements next to the character.
Describe every garment the same way, in the same order. Work top to bottom and never swap words. If shot 1 says "mustard corduroy jacket, unbuttoned, sleeves pushed to the elbows; white crew-neck T-shirt; black straight-leg jeans; white canvas sneakers", shot 14 says exactly that. Calling it a "coat" once is enough to get a different garment.
Write down accessories and which side they sit on. Rings, watches, earrings, bag straps and hair clips drift and swap sides. Write "thin gold ring on right index finger, no watch, no earrings", and cut any accessory the story doesn't need.
Track the state of the clothes. Wet, torn, muddy, sleeves rolled up or jacket off: log the state by scene and keep it until something in the story changes it.
Make outfit changes on purpose. A change of clothes should come with a change of scene or a cut the viewer understands. If it happens mid-scene, viewers read it as a mistake.
Fix one wrong garment instead of regenerating the shot. When a shot is right except that the jacket came back blue, use a video edit model and describe only the change, such as "make the jacket mustard". You keep everything else that worked.
How to keep a house, room or location consistent
Locations drift in quieter ways than faces: a window moves to the other wall, the sofa changes colour, a doorway disappears. Treat each room as a set you build once.
Draw a floor plan. Boxes on paper are enough. Mark which rooms connect, where the windows and doors are, and which way the sofa, bed or desk faces. Every shot has to fit that plan, so the window that was behind her in the wide shot is still behind her in the close-up.
Make one approved master wide for each room. For example, the living room seen from the doorway in late-afternoon light. Approve it, then build every other angle in that room from it, using the master as the environment reference or as the starting frame.
Keep a short fixed list for each room. Note the walls (sage green paint, white skirting), the floor (honey oak boards), windows (one tall sash window, left of the sofa), doors (white panel door with a brass knob), and five to seven hero props with positions (a terracotta lamp on the side table, right of the sofa; a framed record above it). The model can hold onto a handful of details. It can't hold onto forty, so leave the rest unlisted and keep it out of the important shots.
Give hero props their own reference. Anything a character touches or the camera lingers on, such as the mug, the guitar or the front door key, gets its own image.
Keep the light consistent. Write the time of day and where the light comes from ("late-afternoon sun through the window, from frame left"), plus whether practical lamps are on or off. A room lit from the other side reads as a different room, even with identical furniture.
Keep the weather and outside view consistent. If it's raining outside the kitchen window in shot 2, it's still raining in shot 9. If the window looks onto a brick wall, it always does.
Connect rooms with first and last frames. When a character walks from the kitchen into the hallway, start the shot on an approved kitchen frame and end it on an approved hallway frame, so the model fills in the move between two places you already like.
Keep character and location references separate. An environment reference with a person in it invites that person into your shot. Use empty rooms for set references.
Write prompts in two blocks: fixed and variable
Split every prompt into a part that never changes and a part written for the shot.
The fixed block holds the character, wardrobe, set and look descriptions, pasted from your bible word for word. The variable block holds the action, framing, camera move and emotion for this shot.
FIXED: Maya, 27, oval face, dark brown eyes, straight thick brows, small mole above the left corner of her lip, shoulder-length black hair with a centre parting, worn loose. Mustard corduroy jacket, unbuttoned, sleeves pushed to the elbows; white crew-neck T-shirt; black straight-leg jeans; white canvas sneakers; thin gold ring on right index finger. Living room: sage green walls, honey oak floor, tall sash window left of a grey linen sofa, terracotta lamp on the side table right of the sofa. Late-afternoon sun from frame left. 35mm lens, soft film grain, warm muted colours.
SHOT 12: Medium shot. Maya sits on the sofa and reads a letter, then lowers it slowly. The camera pushes in gently. Her expression moves from calm to worried.
A few habits make the variable block more reliable:
- One main action per shot. Two or three actions in one prompt usually means one of them gets dropped or merged.
- Use verbs with only one reading. A line like "holding his phone, calls his family over" can come back as a phone call with the phone at his ear. "Calls out across the room to his family, the phone lowered in his hand" leaves only one reading.
- Name the lens and the framing. "Close-up, 85mm" and "wide, 24mm" keep the camera language steady across the scene.
- Keep the same model and settings for a whole scene. Each video model has its own look, so switching models mid-scene changes the skin, the light and the colour, even with identical prompts.
Shot-by-shot techniques that hold a sequence together
- Make keyframes first, then animate. Generate the first frame of each shot as a still with your references, check it against the bible, and only then turn it into video. Most continuity problems are cheaper to catch in a still.
- Pin first and last frames when a shot has to land somewhere. A first frame sets the framing and look, and a last frame sets the ending. Google's Veo 3.1 developer post describes its first-and-last-frame mode as a way to "bridge two different images".
- Make each shot as long as its action, and no longer. Long clips give the model more time to drift. Chopping one movement into many short clips has the opposite problem: every cut is another chance for something to change, and the movement looks broken. For a reveal or a line of dialogue, one continuous take is usually better.
- Chain carefully. Starting shot B on the last frame of shot A keeps continuous action continuous. Every few shots, go back to your original references, because each chained clip is a copy of a copy.
- Generate takes and choose. For key shots, run two to four takes and keep the one with no continuity errors. Throw away a take with the wrong ring or a missing window instead of hoping nobody notices.
- Keep the technical settings fixed. Use the same aspect ratio, resolution and frame rate for every shot in a sequence. Choose 16:9 or 9:16 before you start, because reframing later crops your carefully placed props.
Consistency for movie shots and narrative scenes
Narrative scenes need the most continuity, because viewers follow geography, eyelines and props from shot to shot. The craft of live-action film applies directly.
- Plan coverage for each scene. Write a shot list: a master wide, mediums, close-ups and reverse angles. Generate all the coverage for one scene in one sitting, with the same references and settings, before you move to the next scene.
- Respect the 180-degree rule. In a two-person scene, keep the camera on one side of an imaginary line between them, so she always looks frame right and he always looks frame left. Write it into the prompt: "camera on her left side, she looks toward frame right".
- Write eyelines into the prompt. Say where each character looks: at the other person off frame left, down at the letter, out of the window.
- Match lenses and light across the scene. The same key-light direction and the same lens choices for wides and close-ups make separately generated shots feel like one scene.
- Cut on action and use inserts. Cutting in the middle of a movement hides small differences. Inserts and cutaways (hands, the letter, the lamp, the rain on the window) bridge two shots that don't match perfectly. Over-the-shoulder shots and silhouettes show less of the face, which helps when identity is shaky.
- Keep a continuity log. Use one row per shot: shot ID, scene, characters, outfit state, props in hand, time of day, light direction, the reference files used, the model and the take you chose. When a reshoot is needed weeks later, this row is how you match it.
Consistency in AI music videos
A music video has more room for style, but viewers still notice when the lead's face or jacket changes between the first chorus and the second.
- Map the song's sections to locations. For example: verse 1 in the apartment at night, chorus on the rooftop, bridge as a daylight memory. Give each location its own set sheet, and bring every chorus back to the same place. A repeated location makes the chorus feel familiar the second time it comes round.
- Cast the artist as themselves. If the artist appears, use their own photos for the character sheet, with their consent. For performance shots, use a portrait plus the vocal, and isolate the vocal with stem separation first for a cleaner sync.
- Use one outfit per section, or one for the whole video. A costume change on the drop reads as a choice. A change halfway through a verse reads as a glitch.
- Use motifs. A red umbrella, a neon sign or a particular car that keeps coming back connects shots even when the scenes change a lot.
- Plan shots in bars. At 120 BPM, one bar of 4/4 lasts two seconds, so a four-bar phrase is eight seconds. Generate shots a little longer than the slot so you have room to cut on the beat.
- Choose the format first. Vertical and widescreen videos need different framing and sometimes different models, so decide before you make keyframes.
If you're still choosing a tool, our comparison of the most advanced AI tools for creating music videos covers the options.
How to fix continuity drift after generation
Even with a full bible, a few shots will drift. Fix them in this order:
- Edit, don't regenerate. Video edit models can change one thing, such as a jacket's colour or the weather outside the window, and keep the rest of the shot.
- Grade everything together. Put all the clips on one timeline and apply one colour grade, with matched white balance and the same grain over everything. A shared grade makes clips from different generations, and even different models, look like one shoot.
- Upscale with one setting. If you upscale, do every clip with the same tool and settings, or sharpness will jump from cut to cut.
- Hide what you can't fix. Crop out a stray prop, cut a beat earlier, or cover a bad moment with an insert.
- Reshoot from the log. If a shot has to go, regenerate it from the same references and the same fixed block, using the row in your continuity log.
Continuity checklist before you export
- Every character's face matches the reference sheet in every close and medium shot.
- Hair length, parting and style are the same within each scene.
- Every garment and accessory matches the wardrobe sheet, including which side accessories are on.
- Clothing state (wet, torn, sleeves rolled up) follows the story.
- Each room matches its floor plan: windows, doors and furniture in the same places.
- Hero props are in the same positions and the same hands.
- Light direction and time of day match within each scene.
- Screen direction and eyelines hold across the 180-degree line.
- All clips share one aspect ratio, frame rate and colour grade.
- Every face shown is one you own or have permission to use.
Where Soundverse fits
Soundverse is an AI music platform that takes you from idea to audience, and its video tools are built around the reference-first workflow above.
In the AI Music Video Generator, you can add up to nine image references for the cast and the setting, and turn off Auto-generate direction to write the characters, setting, camera style and story beats yourself. Turn on Lip Sync for a performance video. Agent One writes the script and quotes the cost for your approval before any scene is filmed.
For a sequence you plan shot by shot, the Multi-Scene Video Builder takes up to 10 scenes, each with a first frame and an optional last frame. Its own guidance matches this guide: the most reliable way to keep a character or place consistent is to give the scenes first frames that show it.
On Seedance 2.5 you can add up to 30 reference images, and Seedance 2.5 Edit changes one thing in a clip, such as an outfit, while keeping its length and framing. Video tools need the Creator plan or above.
This walkthrough shows a song, a character image and a prompt becoming a full music video, with planned scenes and a lip-synced performance.
FAQ
Why does my AI character look different in every shot?
Because the model makes every clip from scratch and only knows what you give it in that run. Text alone leaves too much open, so add the same reference images and paste the same fixed description into every prompt. Start each shot on an approved first frame where you can.
How many reference images should I use for one character?
Two to four clean views of the same person usually works: front, three-quarter and profile, plus the outfit. Limits depend on the tool. Veo 3.1 takes up to three, Kling's Elements guide works with one to four images, and Seedance 2.5 in Soundverse takes up to 30. Every image should show the same face, hair and outfit.
Can I keep the same character across different AI video models?
Partly. Your references and fixed description work in any model, but each model renders skin, light and motion its own way. Keep one model for each scene, and use one colour grade across the whole video so the differences between scenes don't stand out.
How do I keep the same house or room across scenes?
Draw a simple floor plan and make one approved master wide image for each room. Then write a fixed list of walls, floor, windows and five to seven hero props with their positions. Build every other angle from the master, and keep the time of day and light direction the same within each scene.
Can I use a real person's face in an AI video?
Only your own face, or the face of someone who has given you permission. Some video models also block prompts about public figures and other real people, so a shot can fail even when you have permission.
Ready to make yours? Sign up for Soundverse free. There are more guides on video, songs and releasing music on the Soundverse blog.